First Day of School Haul

Saturday, May 26, 2012
Our university is under a trimestral system that's why we already have classes at May. During Thursdays (which is the first day of this term), I have a 5 hour break. Knowing that I'll get bored to death, I grabbed the chance to bond with my best friend. We went to the nearest mall and when I had to return to school, she went to the Super Sale Bazaar at SMX.


From left to right:
  • Charm Pro Big Blending Brush # 11
  • NYX Round Lipstick in Paris
  • NYX Round Lipstick in Orange Soda
  • Maybelline Eye Studio Gel Liner
  • NYX Shine Killer
  • Revlon Age Defying Spa Concealer (Revlon has a buy one get one promo this month on concealers, lipsticks, and eyeshadows!)
Costed me PHP 2000+. It hurt my wallet so much I don't think I'll be getting dessert these next few weeks. lol :)

The Beauty Junkee's Grand 3rd Anniversary

Friday, May 25, 2012
This is another blog giveaway post. The Beauty Junkee is celebrating it's third blog anniversary and Martha, the author, is giving away PHP 70 000 worth of prizes. 16 lucky contestants will each win a loot bag containing products from her sponsors. The brands are Camaru Naturals, Strip It!, Nivea, Carmex, Beauty and Minerals, Digital Traincase, Brown Belly, Majolica Majorca, Tupperware, Flawless Face and Body clinic, LapDance bags, Fresh Fragrance Bar, Royal Effem, Max Factor, and Covergirl.

For more details, go here.

Note: This contest is open to Philippine residents only.

I'm so excited with this blog giveaway and I hope I win! :)

Make-up Maite's Blog Giveaway

Sunday, May 20, 2012
I'm in the process of joining a blog giveaway. This is the first giveaway I am joining in and I really hope I win. The winner will get an Urban Decay Naked 2 Palette. I hope I win. I've been dreaming of owning Urban Decay stuff since I first knew them. lol.

http://makeupmaite.blogspot.com/2012/05/giveaway-naked-2.html

Copied from Make-up Maite's blog:

The Naked palette 2 came out late last year and, apparently, could not stay on the shelf for more than two hours every time they put it on display. If you're one of those who lucked out and walked into the store only to find they were sold out, or simply don't want to dole out the ridiculous amount on the price tag (it retails for around SGD80 or USD50), I have good news: You can get one FREE!

Win the Naked Palette 2 by Urban Decay!

Yes, that's right! I am giving away Urban Decay's Naked 2 palette! This is my first giveaway since starting this blog late last year. This is my way of ending the summer (and welcoming the new school year) with a bang.

Here's a sneak peek of what you'll be getting.

Comes with a mini-tube of Lip Junkie lipgloss.

Naked 2 boasts 12 neutral colors (5 of them new!) in matte, shimmer and glitter textures.


The palette comes with a dual-ended Good Karma crease and eyeshadow brush.


*The pictures above are of my own Naked2 palette. The one the winner will be receiving is sealed.


I was lucky back then to win the grand prize in a raffle. I do hope I'll get lucky again this time. :D

Makeup Review: DollFace 96 Color Palette

Before I go on with the review, I would like to share first my experience with DollFace Cosmetics. I was very pleased with their service - it was easy, hassle-free, and fast. I placed my order on a Thursday and received my package on Saturday. I was also impressed with how they shipped my orders. I ordered a brush set and a palette and both were heavily wrapped in bubble wrap. Tons of bubble wrap! So if you're going to order from DollFace, you don't really need to worry that your order will be damaged upon shipping.

The 96 color palette was enclosed in this box. I already removed the plastic sheet protector on the case so I can get a better picture. The case is made of cheap plastic so be extra careful when handling this.


 Here's the list of ingredients provided at the back of the palette. Take note of the ingredients. Methylparaben has some serious harmful effects while the rest have minimal to moderate harmful effects.


Beside the mirror, you can find two dual-ended sponge tip applicators.


The palette is a combination of matte, satin, and shimmer colors. Since it's nearly impossible to swatch all 96 pans, I just swatched some chosen colors from the pinks, greens/blues, purples, and browns.

 SWATCHES (2 swipes/no primer used)


(pinks; no flash)

(pinks; with flash)

(blues/greens; no flash)

(blues/greens; with flash)

(purples; no flash)

(purples; with flash)

(browns; no flash)

(browns; with flash)

I can't deny that this palette has absolutely gorgeous colors. However, the pigmentation varies per finish. The satin and shimmer colors are more pigmented and have buttery textures. The matte ones (mostly) have bad color payoff and some colors do not even show up on my skin (When I swatch them with my fingers, the color won't transfer to another surface; they're just stuck at my fingertips). The staying power is not that great so you may want to apply primer first (to intensify the colors and to make the eyeshadow last)

I think this palette is perfect for people who are just experimenting with eye looks. For professional makeup artists, I would suggest they just buy individual pots.

I don't really know where I stand on this product. I love the colors but the pigmentation disappointed me.

I also want to give credit to my good friend, Ate Dhee, for helping me out with the transactions. <3 :)

Price: PHP 900
Rating: 3.5/5


Makeup Review: Lancome Oscillation PowerFoundation in Ivory 10

Friday, May 18, 2012


HOW TO USE THIS PRODUCT: The directions are given in the box but since I have thrown them out, I'll just describe the method here. 

With the cover lid on, shake the bottle so that the powder will come out of the holes. Get as much product as you need. Take the applicator and spread the powder in circular motions. Make sure that you hold the button to turn the vibration on. The vibration activates the micro-particles there are in this foundation. This also helps achieve a flawless finish.

PROS:

  • It has subtle shimmers which aren't that noticeable. 
  • It gives off a luminous and matte finish. 
  • After application, my face felt smoother.
  • Also has SPF.
CONS:
  • Since this is a mineral foundation, it provides only sheer coverage. 
  • It works like pressed powder to me. 
  • The application is tedious because of the small applicator. It is easier to apply this product with a brush.
Price: $48 (from Lancome's website)
Rating: 3/5
Will I repurchase: No. This is about PHP 2000+ and I can use that amount of money to buy 2 or 3 cheaper mineral foundations that do the same thing. I like this product, but I do not love it. You may like this product if you don't need to much coverage and if you are into mineral makeup.


Makeup Review: Lancome French Touch Lipstick in 300

First of all, I am not exactly sure with the shade of the lipstick but according to the information provided on the bottom of the tube it says 300. There was no definite name for the shade of lipstick given and I already threw out the box.


(The shape of the lipstick was destroyed due to mishandling.)

SWATCHES
(no flash)

(with flash)


PROS:
  • It glides easily.
  • The metal packaging looks elegant.
  • It has a lightweight feel on the lips.
  • Does not have any weird fragrance
  • No tacky shimmer.
CONS:
  • It is sheer.
  • It is not buildable
  • Since my lips are on the reddish side, this gives only a slight color. Definitely a my-lips-but-better lipstick.
Price: $40
Rating: 3/5
Verdict: Other shades may look more flattering than this one. You might want to check this one out before buying it. The only main problem here is the pigmentation. If you don't mind reapplying, I guess this one is an okay lipstick.


Basic Makeup Brushes

Thursday, May 17, 2012
If you're a beginner like me, you don't need to splurge on expensive 28pc brush sets. All you need are these basics. You may begin to expand your brush collection when you have mastered the basic makeup application techniques. In my opinion, these are the must haves:


FACE:

Powder brush


(source: beautybar.com)


There are different types and sizes of this kind. Some popular ones include the flat top and angled brushes. Powder brush is usually used to spread powder products on to the face (Although I have written in a previous post that powder brushes are used to knock off excess powder. A lot of people use this brush this way and you may find it convenient; it depends on your preference). Powder brushes should be dense so it is easier to pick up loose powder or even blush (if you don't want to spend on a separate brush).

Kabuki brush


(source: E.L.F. UK website)


Kabuki brushes originated from Japan. They function similarly to powder brushes. These brushes are also dense and are mostly used in applying mineral makeup. They also vary in sizes (i.e. for application of foundation, blush, etc) A Kabuki brush is used in a circular motion.
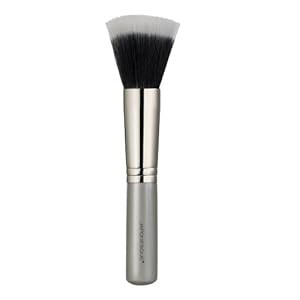
Stippling brush


(image from amazon)


I personally want to own this kind of brush seeing that it is versatile. A stippling brush may be used for applications of liquid and powder foundation, and blush. This is used in a "stippling motion" (also a circular motion. lol)

EYES:


Eye Shader brush


(MAC 239 brush; source: makeupgeek.com)


A basic eye shader brush is flat. Eye shaders may come in small, medium, and large sizes for precise application. The flat shape of an eye shader brush provides the ability to pack lots of color into the bristles.
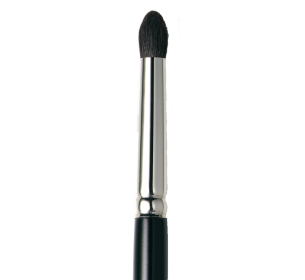
Crease brush


(source: lauramercier.com)

Crease brush are of course used to put color into the crease. Basic eye shader may be tedious to use in this area so it is recommended that you own a crease brush especially when working on smokey eyes. Crease brushes are dome shaped and they may also be used for the lower lids.

Blending brush

(MAC 217; source: maccosmetics.com)


For more advance eye makeup, blending brushes are used to soften up hard edges and create a 'gradient' effect. Blending brushes may also be used for shading. A blending brush is usually fluffy to ensure flawless blending of eyeshadows.

Angled eyeliner brush

(source: amazon.com)

Angled eyeliner brushes are commonly used to apply gel eyeliners. They may also be used for eyeshadows used as liners (wet/dry eyeshadows) and for filling up sparse areas in the eyebrows.


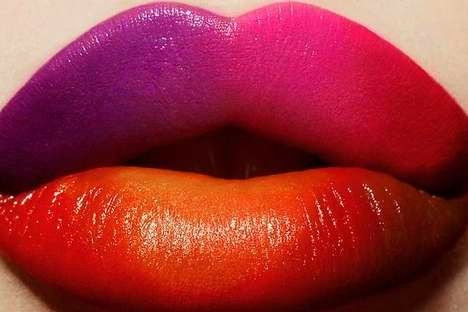
For the lips, a lip brush is not really necessary if you're doing makeup for personal reasons. However, if you'll be using a lip product on another person, it is recommend to use a lip brush for hygienic purposes. As for concealers which comes in pot form, some people would prefer using their fingers as this warms up the product. On another note, it is unhygienic to use pot concealers if more than one person will be using it (Imagine all the fingers which have gone through that pot!)

There are lots of other makeup brushes there but I believe one can do simple, everyday makeup with only these. I hope this helped! :)


Mini Haul From Watsons.

Wednesday, May 16, 2012
After my first facial experience, my mom and I went to Watsons to buy some goodies. In case you didn't know, Watsons is a drugstore here in the Philippines. I believe there are also Watsons outlets in other countries (I've seen one in Hong Kong.) I actually persuaded my mom if we could go there because I wanted to take a look on the Marionnaud brushes. Marionnaud brushes are exclusive for Watsons (I think). They are affordable and I've heard good reviews on them so I wanted to check them out. I was choosing between their N6 brush and the N8 brush. Both are eye brushes. I decided to buy the N8 since I am waiting for the brush set I ordered from DollFace. I thought that the N6 may be similar to one of the brushes in the set. According to the label at the back, the N8 brush is a pointed eyeshadow brush. But I call it a pencil brush. I'll be doing a review on this later on when I have tried it already.


Left to Right:
  • Nichido Eyebrow Shaver 
  • Marionnaud N8 Pointed Eyeshadow Brush 
  • Nivea Visage Refreshing Toner 
  • Nichido Tweezers
  • Celeteque Facial Moisturizer (I got a moisturizer with SPF, which means I can't use it at night. But my mom gave me her Belo night moisturizer. Hooray!)
Thank you, mom! Looking forward to buying more tools and skin care products. :D

My First Facial Experience.

Sorry, I do not have any photos to display in this post. Anyway, my mom, brother, and I went to the nearby mall to get a facial. They've been getting this service for years now while it's my first time today. I wasn't allowed to have a facial before because the attendants say that I am too young. Since I recently turned 18, my mother agreed but she warned me that it'll hurt. In reality, my mom was exaggerating. At least for me it was tolerable. Having my brows threaded hurt more.

Facials are done to remove blackheads and whiteheads. The lady who did my facial explained that the nose is usually the area in the face which have a lot of these flaws. This is because the T-zone (the area along the nose and the forehead) tends to produce a lot of oil. Oily skin attracts more dirt and grime. When we don't clean our face thoroughly, these dirt builds up and forms the blackheads.

Sounds disgusting, right? That's why it is recommended to cleanse our faces deeply. A facial may be done at least once a month. Invest also in good skincare products. You may wash your face with a scrub once a week and a mild facial wash should be used everyday. To get great results, wash your face with warm water and rinse off suds with cold water. This will close your pores and prevent dirt to accumulate in your face. Afterwards, apply a toner to cleanse the face thoroughly. Some toners may strip off moisture from the face so moisturizing is also an important part in any skin care routine. Also, make sure to protect your skin from UV rays by applying sun screen every time you go out (not only when swimming!) To gals who wear makeup everyday, please let your skin breathe. Remove all your makeup before bed so as not to clog your pores.

Taking care of your skin is as important as knowing the basics of makeup application. Clear acne-free skin provides a great canvass to apply your makeup. Start taking care of your skin while your still young. You won't regret it when you grow up. ;)

Tips and Techniques I Recently Learned.

Friday, May 11, 2012
I have been posting less because I am becoming too lazy. Yesterday, I have been watching YouTube makeup tutorial videos mostly from gossmakeupartist. I learned a lot and realized I was doing some techniques wrong. I'm going to share what I have learned yesterday in this blog post. I hope I can remember everything.


  • Powder brush is not used to apply powder. Bit of a shocker really. To apply loose powder, use the foamy applicators which are included in the packaging. Apply powder in a patting/rolling motion so as not to ruin the foundation and leave streaks. The powder brush is only used to knock off excess powder.


  • The rule about where to start the eyebrows is wrong. (The eyebrow starts where the nose of the bridge ends). It actually depends on your preference. If you want to make the nose wider, shave off your brows further back. The opposite is done if you want to achieve a slimmer nose.


  • Arched and slim brows will only make you look older. A softer and fuller brow will instantly make you youthful.

  • This one I have been doing wrong. Do not apply blush on the apples of the cheeks. This should only be used in theatre. When you apply it this way, it only looks okay when you smile. When you aren't, your face will look droopy. Instead, apply blush on the cheekbones.


  • Concealer should only be applied on the dark areas/shadows. Putting it outside this area will only make it look worse.

  • Contouring the nose depends on the shape of the nose. Drawing two lines on the sides of the nose is not applicable for everyone.

  • Eye makeup also depends on the shape of your eyes. Sometimes, what works out for another person may not work out for you.

  • To add a three dimensional look to your lips without applying lip gloss (lip gloss sometimes may give you an 'oily look'), add a bright color eyeshadow (e.g. blue, yellow, orange) on top of your first coat of lipstick. Reapply lipstick and blot. Do as many times as you like.

  • This is called a push brush. As the name suggests, you just push this on your lid near the top of your lashes. Sometimes, a lot of people will use a push brush to draw a line. This push brush is used by 'stamping' the product on and wiggling it to spread the product.

  • Finding the correct shade of foundation can be quite bothersome. To know what your real shade is check your undertones. (I might do a post on this later) Sometimes, your face may appear reddish while the rest of your body has a yellow undertone. If so, choose a foundation shade with an undertone that matches your whole body.

  • Use 99% alcohol to clean your makeup brushes. Makeup brushes are good investments when applying makeup. It's better to have good quality brushes and have bad makeup than having good makeup and bad brushes. Cleaning and maintaining your brushes will make their life last longer. There are a lot of methods to clean brushes like using dishwashing soap, facial wash, and shampoo. However, these methods may not totally clean your brushes to hospital grade. 99% alcohol will fully disinfect them and kill any bacteria present.
So far, these are what I have learned. I'm gonna keep on watching gossmakeupartist's videos. I really recommend watching them. You'll learn a lot because he is a legit professional makeup artist. I hope these have been helpful. :)

*all pictures are from Google Images

YouTube Makeup Guru: gossmakeupartist

Thursday, May 10, 2012
I spent half my day watching makeup tutorials on YouTube. Of course, I had my dose of Michelle Phan videos and I decided to watch other gurus since I might pick up some new tips. It actually interested me to see these guys doing makeup tutorials. I was curious so I just clicked on to the related videos side. I watched videos of 'gossmakeupartist' and I was really impressed! To think that he's a dude, he has mad makeup skills. And he really knows what he's talking about. What separates him from others is that he teaches techniques for all types of eye and face shapes. Some gurus will just do their own generic makeup tutorial. For beginners like me, I recommend you watch this guy's videos. You'll surely learn lots of useful information. Here's a link to his YouTube channel:


Subscribe to him! You won't regret it. :)

Brush Review: E.L.F. Professional Foundation Brush

Tuesday, May 8, 2012
As I have stated in my previous post, I asked my mom to buy me a foundation brush but she got me a wrong one so I decided to buy this myself. I bought this on a whim since I was with my father when we went to the drugstore. I find it weird when I am buying beauty products with guys. Anyway, on with the review..


PROS:

  • Similar to the E.L.F. Total Face Brush, the handle is professional looking.
CONS:
  • The bristles on this brush are not even hairs! They're some synthetic fibers.
  • These 'hairs' are not flexible at all. It's so hard to apply the product with this tool.
  • Leaves streaks. You have to be extra patient in blending liquid foundation.
Price: PHP 130
Rating: 1.5/5
Verdict: This is gonna be harsh but this brush sucks really bad. I think I should probably forget about these E.L.F. brushes. They're (or probably just the ones I got) are good for nothing. I would prefer using my hands to apply foundation rather than using this 'foundation brush'.